
![Solved error RuntimeError [400] [131008] in make.com for WhatsApp Flow](https://danielamoros.com/wp-content/uploads/2024/08/make-solution-error-RuntimeError-131008.png)
Before diving into the details on how to resolve the RuntimeError [400] [131008] in make.com, it is essential to understand what WhatsApp Flow and make.com are, and how they integrate for message automation.
What is WhatsApp Flow?
WhatsApp Flow allows you to automate the sending of forms such as surveys via WhatsApp using the WhatsApp Business API. This tool is ideal for businesses that want to enhance their communication with customers in an automated way without leaving WhatsApp. If you want to learn more about how WhatsApp Flow works, I offer a free kit to test the WhatsApp API, available at this link: WhatsApp API Test Kit.
make.com is an automation platform that integrates with multiple services, including the WhatsApp API, to automate tasks like message sending. Although it is a powerful tool, it currently does not natively support the sending of WhatsApp Flows, which can result in errors such as:
(#131008) Required parameter is missing
Please specify a flow button component within template['components']
when trying to send a WhatsApp API template from make.com.


How to Solve the RuntimeError [400] [131008]?
The RuntimeError [400] [131008] in make.com occurs due to the lack of native support for sending WhatsApp Flows. Below, I will show you how I solved this issue in my project by manually integrating the WhatsApp Business API into make.com.
To solve this problem, we will not use the native WhatsApp Business API integration in make.com. Instead, we will manually configure it by following these steps:
Preparation: Prerequisites
Before starting the configuration, make sure you have the following:
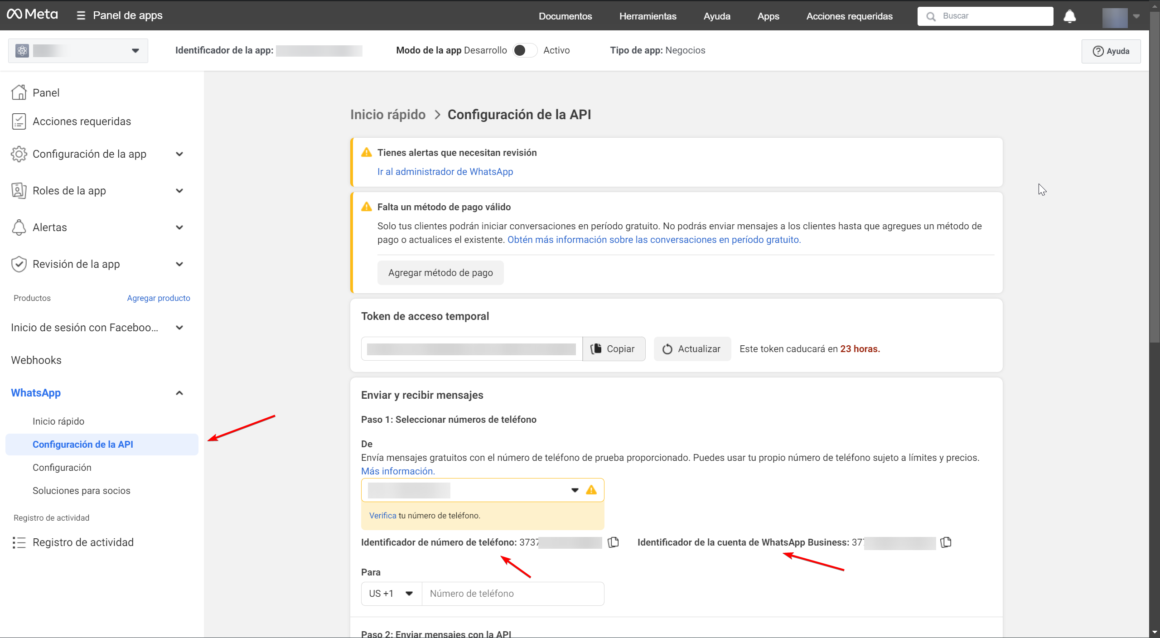
- Permanent or Temporary Token for WhatsApp Business API: You will need this token to authenticate your requests. You can obtain it by following these steps:
- Visit Facebook Developers.
- Select your application.
- Go to the API settings to find your access token.
- Sender ID (Phone Number ID): This is the ID of your WhatsApp Business phone number.

- WhatsApp Flow Template: You need to have a WhatsApp message template created. To do this:
- Access Facebook Business Manager.
- Create your template according to your flow requirements. If you want to know how to create a WhatsApp Flow, you can follow this tutorial.
Configuration in make.com
Step 1: Scenario Setup
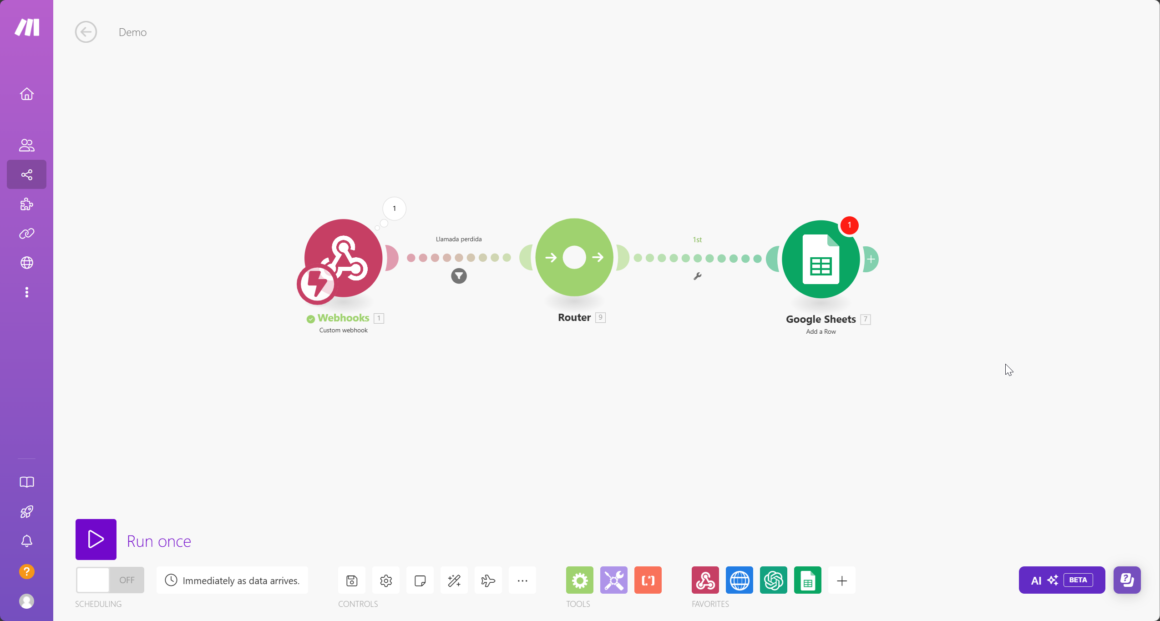
In make.com, create or select an existing scenario. In my case, I already had a scenario configured with a Webhook that receives a JSON and sends the information to Google Spreadsheets as shown in the following image. I will use this setup as the basis for testing.
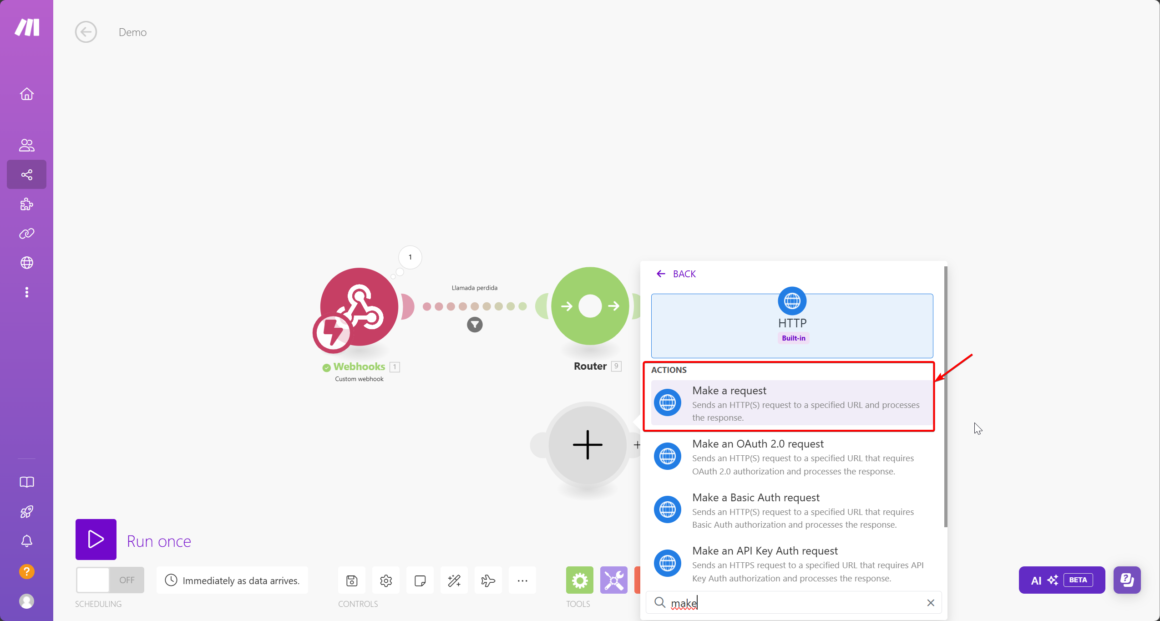
Step 2: Create a “HTTP Make a Request” Module
- Inside the scenario, create a new module of type “HTTP Make a Request”.
2. Fill in the fields as follows:
- URL: Enter https://graph.facebook.com/v20.0/{{Sender_ID}}/messages, where {{Sender_ID}} is your WhatsApp number ID.
- Method: Select POST.
- Headers: Click on “Add a header” and add:
- Name: Authorization
- Value: Bearer {Your_Token} (Replace {Your_Token} with your WhatsApp API token, either temporary or permanent).

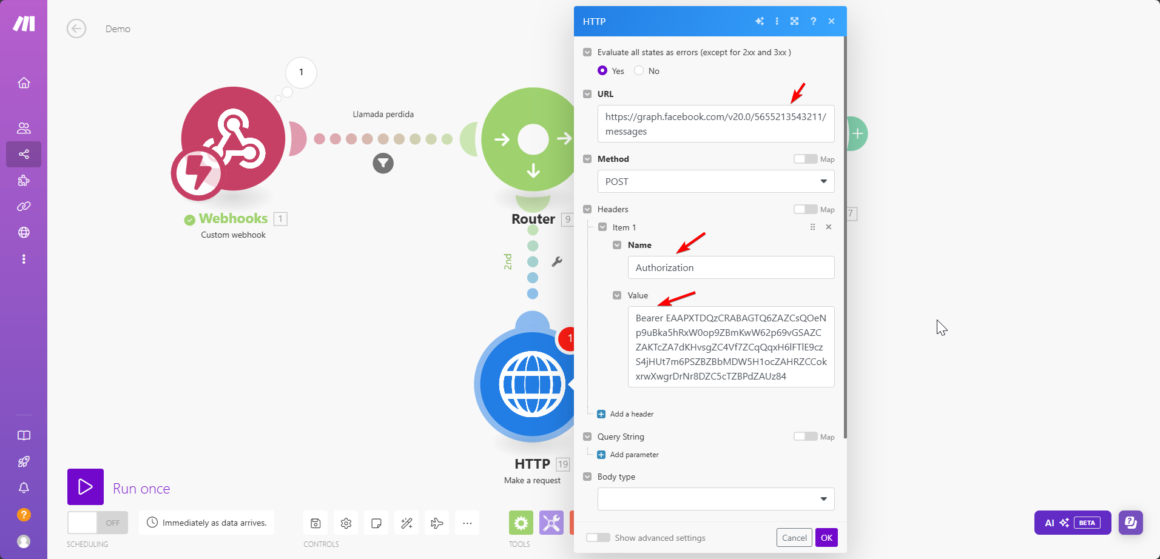
- In Body Type, select RAW.
- Content Type: Set it to JSON (application/json).
- Do not close anything yet, as we will explain the next step.
Step 3: Configure the Request Content Body
Now comes a crucial part. In “Request content”, enter the following JSON. Note that this is an example; you need to fill it with your data:
{
  "messaging_product": "whatsapp",
  "recipient_type": "individual",
  "to": "{{Numero_Whatsapp_destino}}", // Recipient's phone number in E.164 format (e.g., 525555555555)
  "type": "template",
  "template": {
    "name": "{{Nombre_template}}", // Name of your WhatsApp Business template
    "language": {
      "code": "{{Codigo_idioma_pais}}" // Language code of the template, e.g., "es_MX"
    },
    "components": [
      {
        "type": "button",
        "sub_type": "flow",
        "index": "0",
        "parameters": [
          {
            "type": "action",
            "action": {
              "flow_token": "unused",
              "flow_action_data": {
                "flow_id": "{{ID_Del_Template_Whatsapp}}", // ID of the WhatsApp form
                "flow_action": "NAVIGATE",
                "navigate_screen": "SURVEY"
              }
            }
          }
        ]
      }
    ]
  }
}
- {{Numero_Whatsapp_destino}}: Must be in E.164 format (e.g., 525555555555).
- {{Nombre_template}}: The name of the template you created in WhatsApp Business.
- {{Codigo_idioma_pais}}: Language code for the template, like “es_MX”.
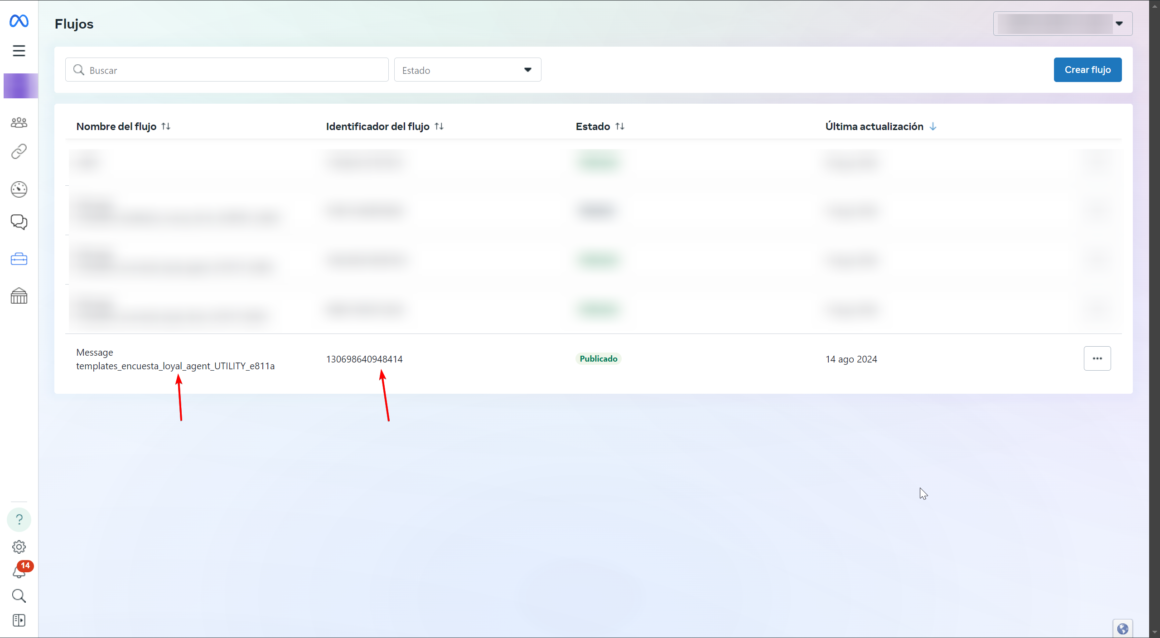
- {{ID_Del_Template_Whatsapp}}: Find this ID in Facebook Business Manager.
Do not close or save anything yet; let’s proceed to the next step.
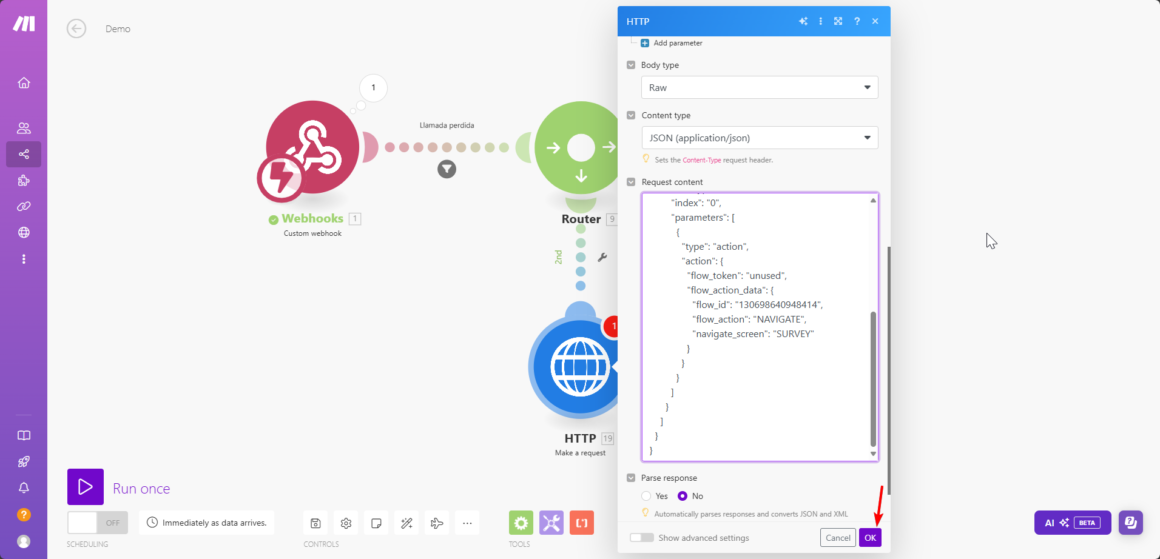
Step 4: Example of Correct Configuration
Below is an example of what a correctly configured Request content should look like:
{
  "messaging_product": "whatsapp",
  "recipient_type": "individual",
  "to": "525555555555",
  "type": "template",
  "template": {
    "name": "encuesta_loyal_cliente_rating",
    "language": {
      "code": "es_MX"
    },
    "components": [
      {
        "type": "button",
        "sub_type": "flow",
        "index": "0",
        "parameters": [
          {
            "type": "action",
            "action": {
              "flow_token": "unused",
              "flow_action_data": {
                "flow_id": "130698640948414",
                "flow_action": "NAVIGATE",
                "navigate_screen": "SURVEY"
              }
            }
          }
        ]
      }
    ]
  }
}
Step 5: Testing and Verification
Once you have configured everything, it is time to run a test to ensure that the WhatsApp Flow sends correctly without any issues. But before anything else, don’t forget to click OK and save your scenario.
Step 6: Execute the Test
Run a test to check that the flow works correctly. Here’s an example of how it should look:

Conclusion: Optimize Your WhatsApp Flow Integration in make.com
By following this step-by-step guide, you should be able to resolve the RuntimeError [400] [131008] and successfully integrate WhatsApp Flows in make.com without any problems. Remember, the key lies in the manual configuration of the WhatsApp API.
Buy Me a Coffee!
I hope this tutorial was helpful in effectively integrating and sending WhatsApp Flows in make.com. If it helped clear up your doubts or made your job easier, consider buying me a coffee! Your support helps me continue to create quality content. If you want to learn more about marketing, subscribe.